The “Pro” version has several additional options for forms and form fields you can use in your registrations. Use this guide for help with how to use the basic form builder.
Form Builder Overview
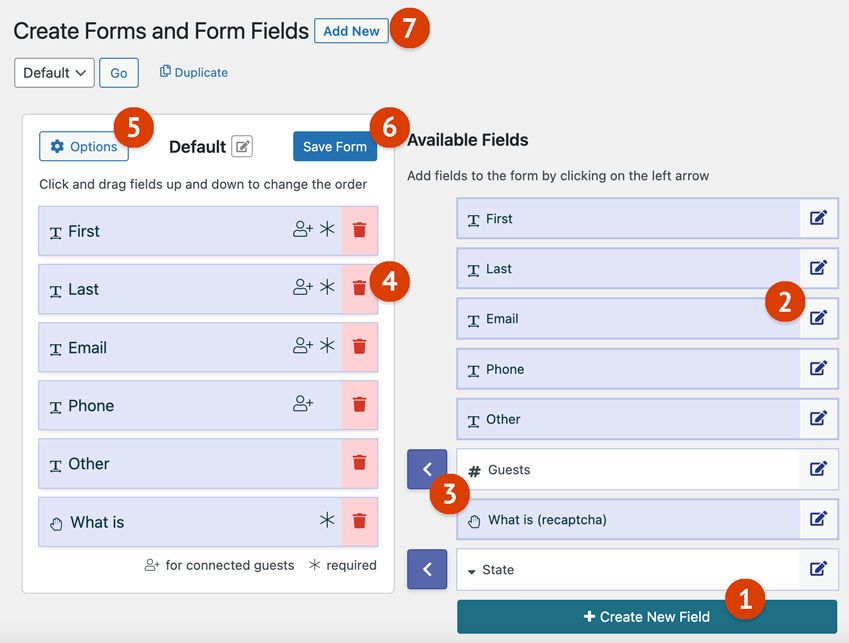
The form builder can be reached through a button on the “Form” tab labeled “Create Forms and Fields”. You can also navigate to the form builder directly using the menu item “All Forms” under the “Registrations” menu. The form builder allows you to create and edit forms and form fields. Each event can be assigned a different form.
- Create New Fields
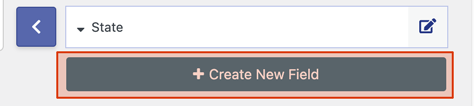
Click the “Create New Field” button to reveal settings for a new field. You can create several types of fields. Take a look at the Create Form Fields section for more information. - Edit Existing Fields
Clicking the pencil icon next to an existing field will allow you to make edits. Changes affect all forms that use the field. - Add a Field To A Form
Clicking the left chevron arrow icon next to an existing field will add the field to your form. Reorder the fields in the form by clicking and dragging once it’s moved. - Remove a Field From a Form
Clicking the trash icon next to a field that has been added to the form will remove it from the form. The field will still be available for other forms. - Advanced Form Options
Clicking the “Options” button will open a modal to edit more advanced form settings like what fields are required. Take a look at the Form Options section for more information. - Save Changes and Edit Form Label
Save your changes to see any modifications for your event forms. Clicking the pencil icon next to the form title will allow you to change the name of the form. - Create New Forms
Use the items at the top of the page to create a new form, duplicate an existing form, and change which form you are editing.
Create Form Fields
You can create as many form fields as you’d like to use in your forms. Each form field is available for use in all of your forms so making changes to a form field will also make the same change to every form that uses that field.
- Edit a Form
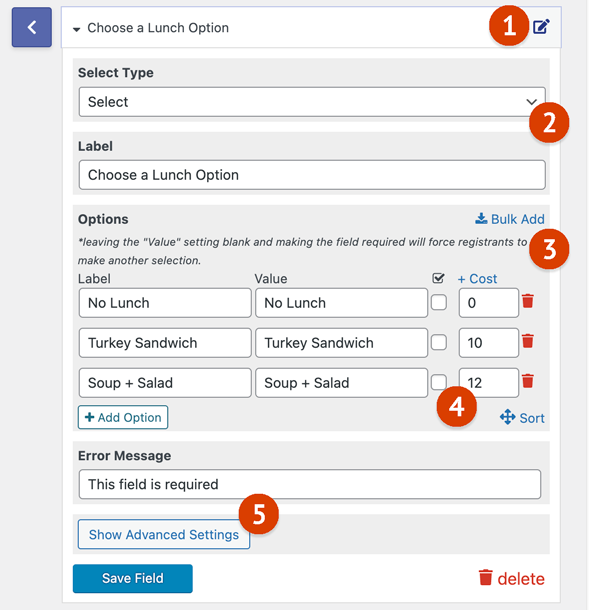
Click the gray button with the pencil icon on the right side of a field to toggle options for that field. - Select a Field Type
Depending on the type of response needed from your registrants, you can select the field type you would like to use. See the Field Types section below. - Configure Field Specific Options
Each field type has unique options that fit with the type of response expected from registrants. - Add a Cost to a Selection
Some form field types can have a cost attached to them when selected. Read our guide for form fields costs for more details. - Advanced Field Options
Clicking the “Show Advanced” button will reveal additional settings for the field like the validation type, costs, and HTML to be added after the field.
Form Field Types
There are several form field types that can be used in your forms. This includes some special fields that have been created by default.
Special Fields
- First and Last
These fields are used to identify the registration in the backend as well as the default attendee list. - Email
The email field is used for all emails sent to the registrant. It’s required to be in your form if you plan to have emails sent to your registrants. - Guests
The response in this field counts toward the registration limit for an event. - Phone
This field will be specially formatted based on your chosen phone nunber format. - What is (recaptcha)
This field can be used as a simple math question or Google’s recaptcha “I am not a robot” challenge that must be correct for the form to submit.
Custom Field Types
- Text
For open ended responses of words or phrases. - Number
For quantities of something - Select
Dropdown list an attendee can select from. - Multiple Checkbox
List of options that allows for multiple selections. - Radio
List of options an attendee can choose one of - Single Checkbox
Opt-in field that works for terms and conditions acceptance. - Textarea
For longer open ended responses of a paragraph or more. - File Upload
For uploading files such as images or spreadsheets. - Date
Uses an interactive calendar to select dates.
Form Options
Each form can have unique settings that will apply to any event’s registration that it’s assigned to. If your event uses our connected guests feature, you can configure what form fields are available and required for the main registration and the connected guest.

- Configure the “Main” Registration Fields
Fields for the first “main” registration - Configure the “Connected Guest” Registration Fields
Fields for each additional “connected guest” - Toggle Visible and Required Fields
Toggle whether or not the form field appears for the “main” registration (green button) and whether or not it is required (blue)
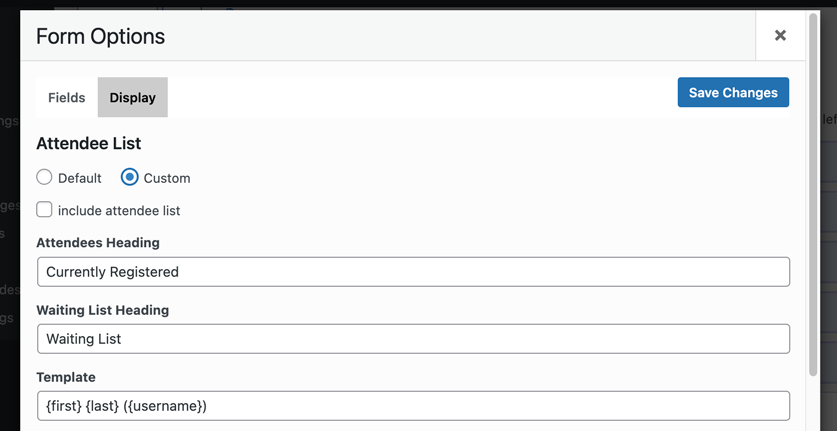
In this modal, you can also configure the attendee list, attendance count message, and the message that appears at the top of the registration form. Switch to the “Display” tab to see these options.
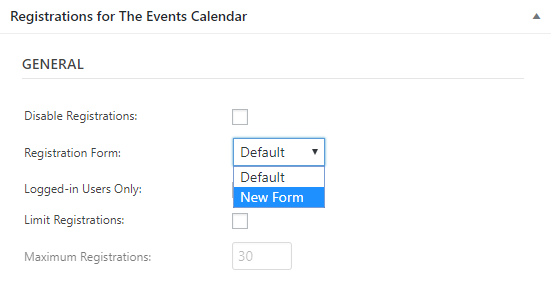
Assign Your New Form to an Event
You can assign your new form to be used for an event by visiting the WordPress dashboard. Then click on “Events”. Find the event you would like to assign the form to and click “Edit”. Scroll down the page to find the setting to change the registration form
Field Customization Examples
Using some special settings for a field along with some JavaScript and CSS you can create some customized fields with special functionaliy.
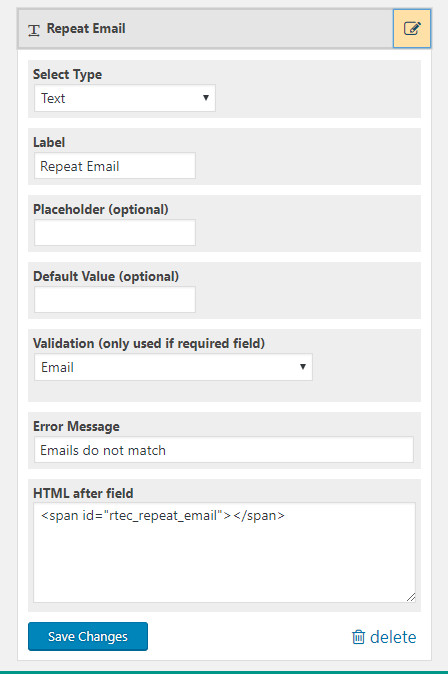
Repeat Email Field
To create a field that asks the attendee to verify the email address by typing it again, follow these steps:
- Create a new field using the button on the bottom right
- Change the label to “Repeat Email” or something similar
- Change the “Validation” to “Email”
- Change the error message to something like “Email does not match”
- Add the following snippet of html to the appropriate field (this allows the JavaScript to work)
- Save your changes, add it to the form, make it a “required” field

- After adding this field to the form, click and drag the field so it appears in the form just after the “Email” field.
- On the “Form” tab, add the following to the “Custom JavaScript” area:
var repeatInput = $('#rtec_repeat_email').closest('.rtec-form-field').find('input'),
    emailInput = $('input[name=rtec_email]');

function rtecEmailsMatch() {
  var repeatVal = repeatInput.val(),
      emailVal = emailInput.val();
  if (repeatInput.val() !== emailInput.val()) {
      var $formField = repeatInput.closest($('.rtec-input-wrapper'));
      if (!$formField.find('.rtec-error-message').length) {
          $formField.append('<p class="rtec-error-message" role="alert">'+repeatInput.closest($('.rtec-form-field')).attr('data-rtec-error-message')+'</p>');
      }
      repeatInput.attr('aria-invalid','true');
  } else {
      repeatInput.closest($('.rtec-input-wrapper')).find('.rtec-error-message').remove();
      repeatInput.attr('aria-invalid','false');
  }
}

$('.rtec-form').submit(function() {
    rtecEmailsMatch();
});

repeatInput.keyup(function() {
    rtecEmailsMatch();
});
emailInput.focusout(function() {
    rtecEmailsMatch();
});
*Note – The form will still submit if the fields don’t match and the attendee has entered valid email addresses in both fields though having the “Repeat Email” field should help attendees avoid entering an incorrect email address.
Radio Fields with a Text Field for “Other”
To create a radio select field with the last option as an “Other” field. Follow these steps:
- Create a new field using the button on the bottom right
- Choose “Radio” for the feild type
- Enter your selection choices with the last field being the “Other” option
- Add the following snippet of html to the appropriate field (this allows the JavaScript to work)
- Save your changes, add it to the form, make it a “required” field
- On the “Form” tab, add the following to the “Custom JavaScript” area:
var pleaseSpecify = 'Please enter your choice here',
    $fieldWrapper = $('#rtec_add_other_field').closest('.rtec-form-field'),
    $lastOption = '',
    inputName = '',
    disabledInput = '',
    $allOptions;

if ($fieldWrapper.find('input[type=radio]').length) {
  $allOptions = $fieldWrapper.find('input[type=radio]')
  $lastOption = $fieldWrapper.find('.rtec-input-wrapper input[type=radio]').last();
  inputName = $fieldWrapper.find('.rtec-input-wrapper input[type=radio]').attr('name');
  disabledInput = inputName + '_na';
}


if ($lastOption !== '') {
  $allOptions.on('change',function() {
    if($lastOption.is(':checked')) {
      $allOptions.attr('name',disabledInput);
      $fieldWrapper.find('.rtec-input-wrapper').append('<input id="rtec-the-new-other" type="text" placeholder="'+pleaseSpecify+'" name="'+inputName+'">');
    } else {
      $allOptions.attr('name',inputName);
      $fieldWrapper.find('#rtec-the-new-other').remove();
    }
  });
}

Conditionally Revealed Fields
The Registrations for the Events Calendar plugin does not yet support conditional fields. In the meantime we have a workable custom solution you can try: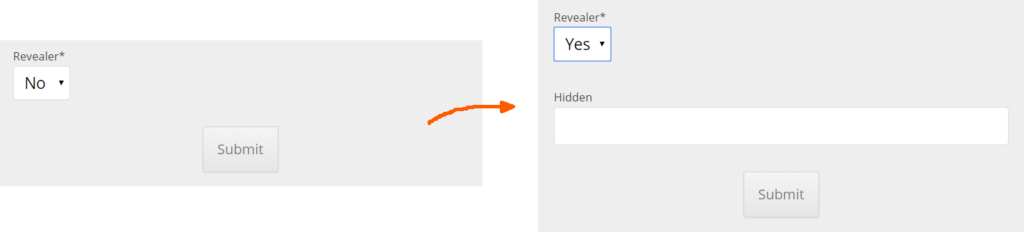
- Designate a form field to reveal other fields conditionally. This should be a select field, radio field, or checkbox field.
- Add this to the “HTML after field” setting for the field that will reveal the other fields:
Your settings will look something like this:
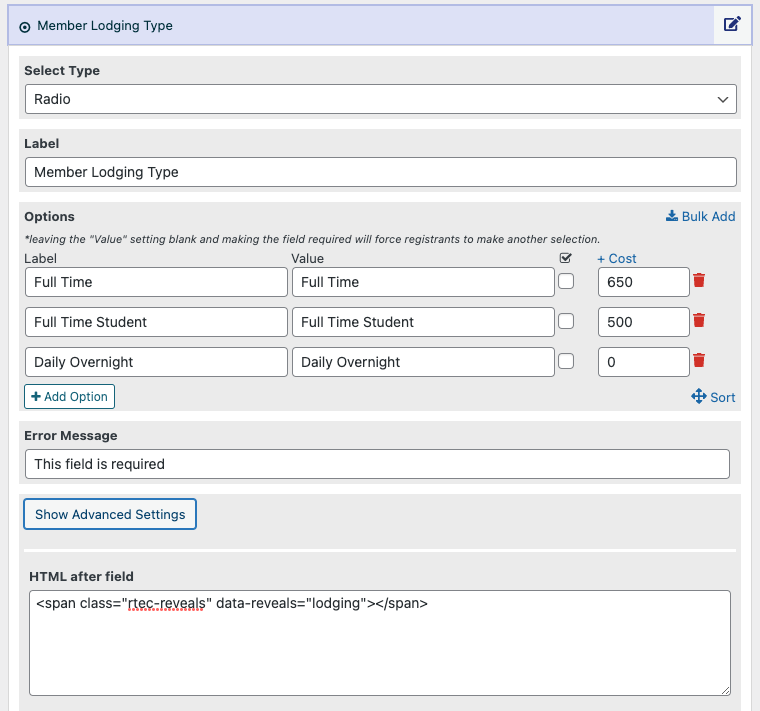
- You will need the key that is the “lodging” part of the example for use later.
- Make sure to add this field to your registration form.
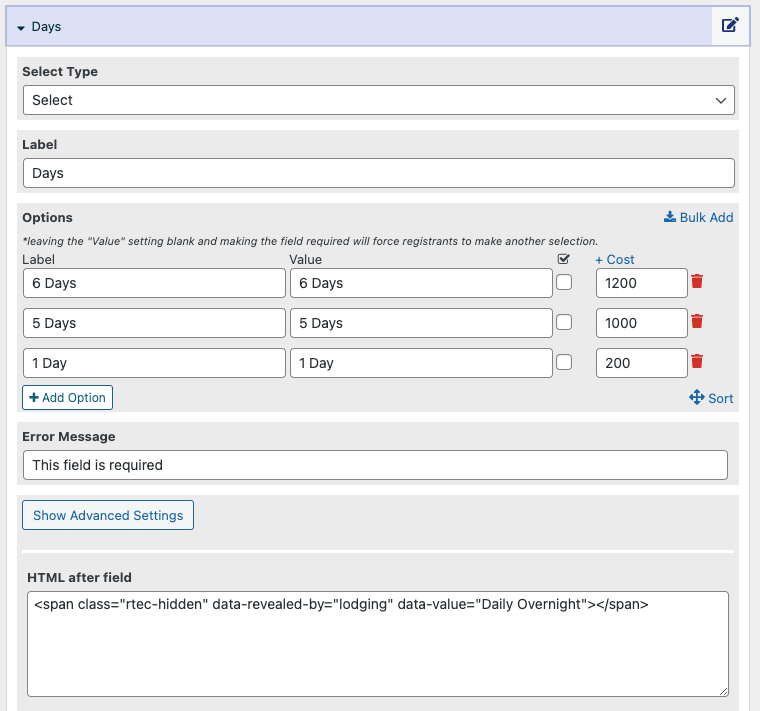
- Add this to the “HTML after field” setting for each field you wish to reveal conditionally based on the value of the field you created as the “revealer”:
Your settings will look something like this: - Match the “lodging” key to the revealer field you created as this let’s the code know what field to check in order to conditionally reveal this field. The “Daily Overnight” part of the HTML determines the value of the revealing field that will condtionally show this field. For example if the “Member Lodging Type” type field has the chosen value “Daily Overnight” then this field will show. Otherwise it will be hidden.
- Add this to the “Custom JavaScript” field on the “Form” tab:
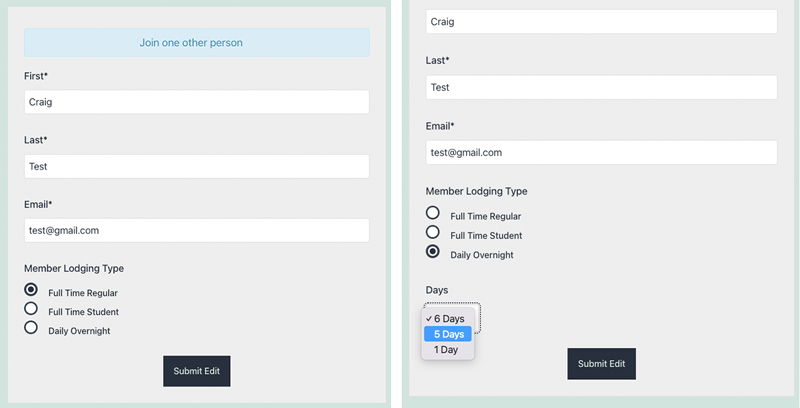
function ruUpdateRevealers($rtec) { var revealers = {}; $rtec.find('.rtec-reveals').each(function(index) { revealers[index] = { $wrapper : $(this).closest(('.rtec-form-field')), valueSelected : $(this).closest('.rtec-form-field').find('select').length ? $(this).closest('.rtec-form-field').find('select option:selected').val() : $(this).closest('.rtec-form-field').find('input:checked').val(), reveals : $(this).attr('data-reveals'), } }); return revealers; } function ruUpdateRevealedBy($rtec, revealers) { $rtec.find('.rtec-form-field').each(function() { if ($(this).find('.rtec-hidden').length) { var $wrap = $(this), revealedBy = $(this).find('.rtec-hidden').attr('data-revealed-by'), revealValue = $(this).find('.rtec-hidden').attr('data-value'); if (typeof $(this).find('.rtec-hidden').attr('data-original') === 'undefined') { $(this).find('.rtec-hidden').attr('data-original',ruCustomFormGetVal($wrap)); } $.each(revealers,function() { if (revealedBy === this.reveals && revealValue === this.valueSelected) { ruRevealField($wrap,$wrap.find('.rtec-hidden').attr('data-original')); } else { ruHideField($wrap); } }) } }) $rtec.find('.rtec-html-wrap').each(function() { if ($(this).find('.rtec-hidden').length) { var $wrap = $(this), revealedBy = $(this).find('.rtec-hidden').attr('data-revealed-by'), revealValue = $(this).find('.rtec-hidden').attr('data-value'); if (typeof $(this).find('.rtec-hidden').attr('data-original') === 'undefined') { $(this).find('.rtec-hidden').attr('data-original',ruCustomFormGetVal($wrap)); } $.each(revealers,function() { if (revealedBy === this.reveals && revealValue === this.valueSelected) { ruRevealField($wrap,$wrap.find('.rtec-hidden').attr('data-original')); } else { ruHideField($wrap); } }) } }) } function ruRevealField($field,originalVal) { $field.show(); ruCustomRemoveNA($field,originalVal); } function ruHideField($field) { $field.hide(); ruCustomSetToNA($field) } function ruCustomFormGetVal($field) { if ($field.find('input').length) { return $field.find('input').first().val(); } else if ($field.find('select').length) { return $field.find('select').first().val(); } else if ($field.find('textarea').length) { return $field.find('textarea').first().val(); } return false; } function ruCustomSetToNA($field) { if ($field.find('input[type=checkbox]').length) { $field.find('input[type=checkbox]').first().val('NA'); $field.find('input[type=checkbox]').first().prop('checked',true); } else if ($field.find('input').length) { $field.find('input').first().val('NA'); } else if ($field.find('select').length) { $field.find('select option').first().val('NA').prop('selected',true) } else if ($field.find('textarea').length) { $field.find('textarea').first().text('NA'); } } function ruCustomRemoveNA($field,original) { if ($field.find('input[type=checkbox]').length) { $field.find('input[type=checkbox]').first().val(original); $field.find('input[type=checkbox]').first().prop('checked',false); } else if ($field.find('input').length) { $field.find('input').first().val(original); } else if ($field.find('select').length) { $field.find('select option').first().val(original) } else if ($field.find('textarea').length) { $field.find('textarea').first().text(original); } } $('.rtec').each(function() { if ($(this).find('.rtec-form-field').length) { var $rtec = $(this), revealers = ruUpdateRevealers($(this)); ruUpdateRevealedBy($rtec, revealers) $.each(revealers,function() { this.$wrapper.find('select').on('change',function() { var newRevealers = ruUpdateRevealers($rtec); ruUpdateRevealedBy($rtec, newRevealers) }) this.$wrapper.find('input').on('change',function() { var newRevealers = ruUpdateRevealers($rtec); ruUpdateRevealedBy($rtec, newRevealers) }) }); } }); - The result of the example above should look like this:
- Conditionally show and hide HTML by wrapping it in a div with the class “rtec-html-wrap”. Example:
- You can have multiple groups of conditional fields by changing the key used (“lodging” in this example) and duplicating the steps.
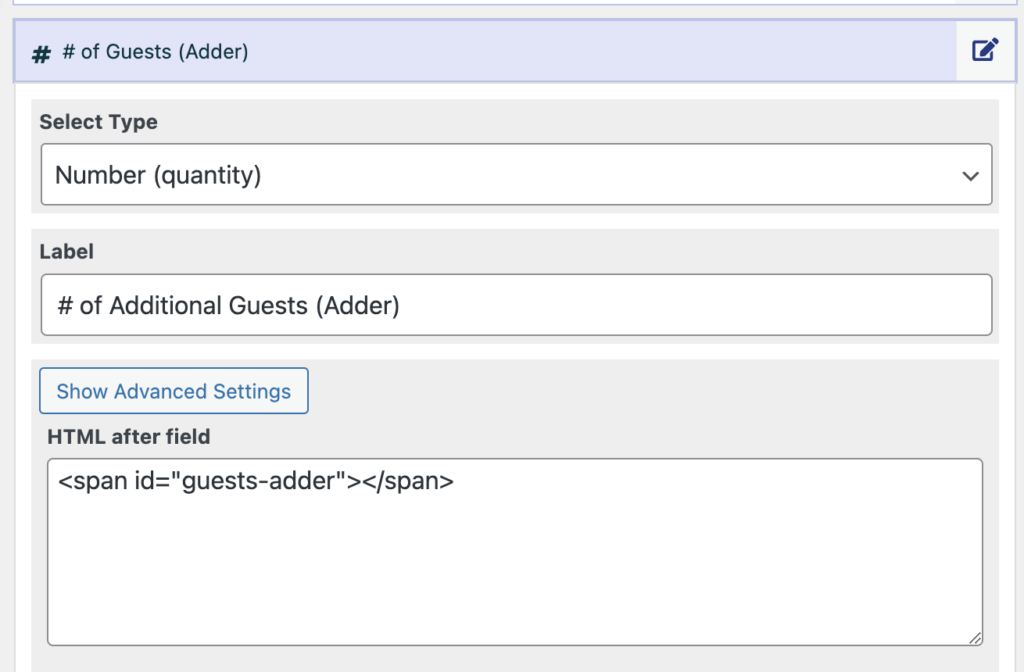
Connected Guest Adder Field
To create a field that asks the attendee to input a number of guests and then automatically create the corresponding connected guests, follow these steps:
- Create a new field using the button on the bottom right
- Change the label to “Additional Guests” or something similar
- Change the “Field Type” to “Number”
- Add this to the “HTML after field” setting:
Your settings will look something like this: - Make sure to add this field to your registration form.
- On the “Form” tab, add the following to the “Custom JavaScript” area:
function ruGuestsAdderInit() {
	if (! $('#guests-adder').length) {
		return;
	}
	var ruTotal = 0;
	$(window).on('rtecafteraddconnected', function (event) {
		setTimeout(function() {
			ruCheckGuests();
			$('.rtec-add-child').prop('disabled',false);
		}, 1000);
	});
	function ruCheckGuests() {
		inputtedGuests = $('#guests-adder').closest('.rtec-form-field').find('input').val();
		if (parseInt(inputtedGuests) > parseInt($('.rtec-field-group-guest').length)
			&& ruTotal < parseInt(inputtedGuests)) {
			ruTotal++;
			$('.rtec-add-child').trigger('click');
			$('.rtec-add-child').prop('disabled',true)
		} else {
			$('.rtec-fg-main-item').trigger('click');
		}
	}
	$('#guests-adder').closest('.rtec-form-field').find('input').on('change',function() {
		clearTimeout(ruDoneTyping);
		var ruDoneTyping = setTimeout(function() {
			ruCheckGuests();
		}, 2000);
	});
}


$(window).on('rtecafterforceupdate', function (event) {
	ruGuestsAdderInit();
});