“The Events Calendar” by Modern Tribe is an incredible plugin not just because of how simple it is to use and all of the features it has for managing your events, but by how customizable it is. This is a quick tutorial about the basics of making some changes to the month (calendar), list, and single event views using a bit of PHP code and, in the case of the month view, adding a file to your theme.
You can do just about anything with the templates and hooks (“Registrations for the Events Calendar “is built almost entirely on a few hooks from “The Events Calendar”) but this article is going to show you how to add the number of seats/spots/registrations remaining for your event collected using the extension Registrations for the Events Calendar.
Month (Calendar) View
This is the trickiest of the customizations as it requires creating a new file and uploading it to your theme. If you follow the steps laid out below, you should be able to get this working easily enough.
1) Create a New PHP File
The first step will be to create a file and name it single-event.php. This can be done with a program like Notepad for Windows (comes pre-installed) or TextEdit on Macs. Just save a new file as single-event.php. Put the file on your desktop for easy access.
2) Copy and Paste the Code From “The Events Calendar”
Next, you are going to copy the existing code “The Events Calendar” uses to create each individual event you see on the month view. You will want to use an FTP client (like Filezilla) to view all of the files for your site. Alternativle you could use a program that can “explore” files on your host’s server available through something like CPanel.
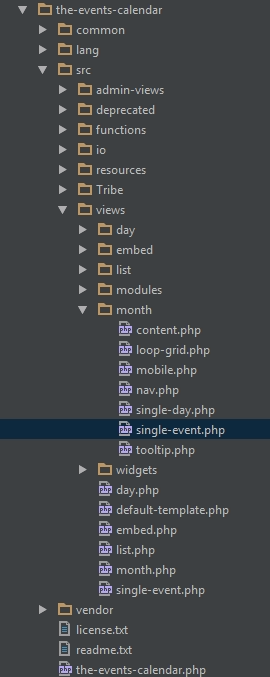
Open up the source files for “The Events Calendar” found in the wp-content/plugins/the-events-calendar folder. Then find the month/single-event.php file in the path the-events-calendar/src/views/month/. You’ll notice after opening the file that there is a note in the comments “Override this template in your own theme by creating a file at [your-theme]/tribe-events/month/single-event.php”
Open the file you created earlier (single-event.php) and paste the entire contents of the file from “The Events Calendar” you just found inside. Save your changes.
3) Add Code To Modify What You See for Each Event
The code you will want to modify is all the way at the bottom of the file. Starting on line 193, change this code:
?>

<div id="tribe-events-event-<?php echo esc_attr( $event_id ); ?>" class="<?php tribe_events_event_classes() ?>" data-tribejson='<?php echo esc_attr( tribe_events_template_data( $post ) ); ?>'>
	<h3 class="tribe-events-month-event-title"><a href="<?php echo esc_url( $link ) ?>" class="url"><?php echo $title ?></a></h3>
</div>
to this:
$html = '';

// Only run this code if Registrations for the Events Calendar is active
if ( function_exists( 'rtec_get_event_meta' ) && isset( $post->ID ) ) {
	$event_post_id = $post->ID;
	// Get information about this event related to registrations
	$event_meta = rtec_get_event_meta( $event_post_id );
	// If this event has limited seats
	if ( $event_meta['limit_registrations'] ) {
	    // Calculate the number of seats remaining and display a note
		$registrations_remaining = $event_meta['max_registrations'] - $event_meta['num_registered'];
		$html = '<span>Remaining: <strong>' . $registrations_remaining . '</strong></span>';
	}
}
?>

<div id="tribe-events-event-<?php echo esc_attr( $event_id ); ?>" class="<?php tribe_events_event_classes() ?>" data-tribejson='<?php echo esc_attr( tribe_events_template_data( $post ) ); ?>'>
	<h3 class="tribe-events-month-event-title"><a href="<?php echo esc_url( $link ) ?>" class="url"><?php echo $title ?></a></h3>
	<?php echo $html; ?>
</div>
The first part of the change to the code calculates the number of registrations left for the event. Then the generated html is outputted right below the event title with the code:
<?php echo $html; ?>4) Put the New File inside New Folders and Upload Them to Your Theme
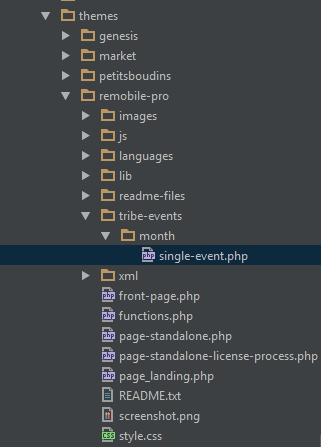
After making these changes, save this file in a new series of folders with the file path suggested (tribe-events/month/). This breaks down to create a folder named “month”, move your “single-event.php” file into the “month” folder, then create a folder named “tribe-events” and move the “month” folder inside it.
Finally, use an FTP client or something similar to upload your new file and folders into your current active theme’s files. The folder should be located in the root folder of your theme as shown here for “remobile-pro.”
Additional Things to Consider
Adding more html can cause the tooltip that is displayed to appear too low to click on the event link. You may need to add this CSS (Registrations for the Events Calendar has a special area for this on the “Form” tab labeled “Custom CSS”) to change the position:
.tribe-events-calendar .type-tribe_events .tribe-events-tooltip {
  bottom: 47px !important;
}
You can raise or lower the “47” in the example to move the tooltip’s position up or down.
You may also need to add some CSS to get your add html to align with the default content. For example, our registrations count information will need some padding on the left added in order for it to line up with the event title. You can add this to the same section as mentioned above:
.tribe-events-calendar .rtec-custom-limit {
  padding-left: 5%;
}
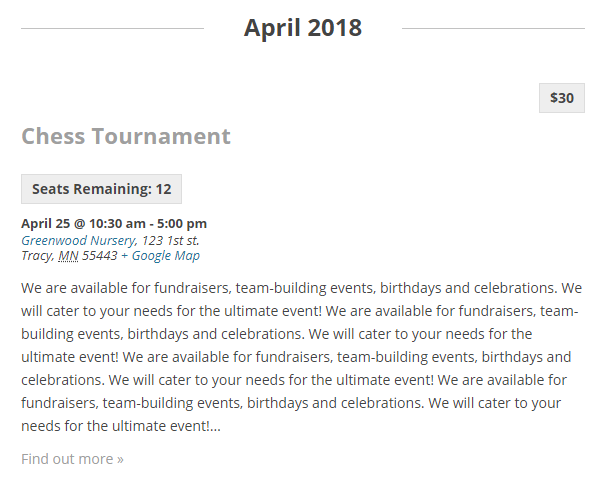
List View
Adding things to the “list” view is made very convenient by a few PHP hooks that simply run code in a specific part of the template that creates each event you see in the list.
Add PHP to Your Theme’s Functions File
Open your theme’s functions.php file and add the following PHP code snippet:
function rtec_custom_registration_count_display() {
    // Only run this code if Registrations for the Events Calendar is active
	if ( function_exists( 'rtec_get_event_meta' ) ) {
		$event_id                = get_the_ID();
		$registrations_remaining = '';
		// Get information about this event related to registrations
		$event_meta = rtec_get_event_meta( $event_id );
		// If this event has limited seats
		if ( $event_meta['limit_registrations'] ) {
			// Calculate the number of seats remaining and display a note
			$registrations_remaining = $event_meta['max_registrations'] - $event_meta['num_registered'];
			echo '<span class="rtec-custom-limit">Seats Remaining: ' . $registrations_remaining . '</span>';
		}
	}

}
add_action( 'tribe_events_before_the_meta', 'rtec_custom_registration_count_display' );
How to Change Where the Code Outputs
This code uses one of the 6 different hooks in the the-events-calendar/src/views/list/single-event.php template that correspond to different sections of the text (top to bottom). You can change the ‘tribe_events_before_the_meta’ part of the code to move the custom html to a different part of the template with these other areas in order from top to bottom:
- ‘tribe_events_before_the_event_title’
- ‘tribe_events_after_the_event_title’
- ‘tribe_events_before_the_meta’ (our example)
- ‘tribe_events_after_the_meta’
- ‘tribe_events_before_the_content’
- ‘tribe_events_after_the_content’
Single Event View
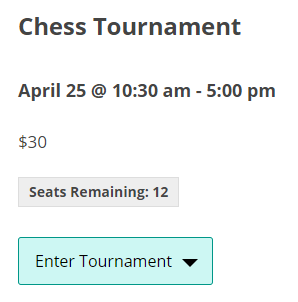
The “Single Event” view is where all of the details of a single event are given including the full content and the google map if you activate your google maps API key. This is also where Registrations for the Events Calendar includes a registration form.
Add PHP to Your Theme’s Functions File
Like you may have done with the “list” view customization, open your theme’s functions.php file and add the following PHP code snippet:
function rtec_custom_single_registration_count_display() {
    // Only run this code if Registrations for the Events Calendar is active
	if ( function_exists( 'rtec_get_event_meta' ) ) {
		$event_id                = get_the_ID();
		$registrations_remaining = '';
		// Get information about this event related to registrations
		$event_meta = rtec_get_event_meta( $event_id );
		// If this event has limited seats
		if ( $event_meta['limit_registrations'] ) {
			// Calculate the number of seats remaining and display a note
			$registrations_remaining = $event_meta['max_registrations'] - $event_meta['num_registered'];
			echo '<span class="rtec-custom-limit">Seats Remaining: ' . $registrations_remaining . '</span>';
		}
	}

}
add_action( 'tribe_events_single_event_before_the_content', 'rtec_custom_single_registration_count_display', 9 );
There are 4 hooks that allow you to position your customization in different parts of the template. You can change the ‘tribe_events_single_event_before_the_content’ part of the code to move the custom html to a different part of the template with these other areas in order from top to bottom:
- ‘tribe_events_single_event_before_the_content’ (our example)
- ‘tribe_events_single_event_after_the_content’
- ‘tribe_events_single_event_before_the_meta’
- ‘tribe_events_single_event_after_the_meta’
Need help getting this to work or need to hire someone for an extensive customization? Contact support and we might be able to help.


